i see bots
In the future, you won't think this is so weird
Category Archives: Davis Scientific
1-Wire
“1-Wire” is the name for a device bus protocol designed to be inexpensive, easy to connect, and easy to interface with.
The name “1-Wire” is a marketing take on the fact that data is conducted over a single wire. You still need a ground connection, but “2-Wire” presumably didn’t sound as interesting. In this configuration, devices on the bus operate in “parasitic” mode, storing power accumulated during bus transitions. In reality, I found it more reliable to operate in “3-Wire” mode, where you send some power along a third wire. The specification was originally introduced by Dallas Semiconductor, which was subsumed into Maxim via acquisition.
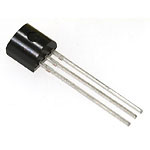
See Maxim’s list of devices and bus infrastructure. The DS18S20 temperature sensors I’m most familiar with look like your average transistor (image from here):
A given implementation of a 1-Wire bus, which Maxim refers to as a “microlan”, is composed of a bus controller or “master”, the physical wire segments of the network itself, and the “slave” 1-Wire devices attached to those segments. The bus controller can be: a dedicated hardware device, which connects to the 1-Wire bus on end and, say, an RS-232 port on the other, and implements the requisite bus protocol. Or, you can directly connect the bus to a PC’s serial port via a simple circuit, and work the bus in software on the PC.
In theory, any number of 1-Wire devices can be attached to a 1-Wire bus, since each device has a 64-bit unique identifier burned into it, which the controller/master uses to track the slave devices. However, there are important topological considerations to take into account, given the electrical characteristics of the wire segment of the network, which, due to impedence “weights”, can introduce signal reflections. Maxim covers these topics in a design note (here), to help explain which network topologies to avoid (such as “star” networks), and which ones to favor.
I started using 1-Wire nearly 10 years ago, because I found an inexpensive weather station from AAG based on 1-Wire devices. I mounted the weather station on the roof and ran a couple (ok, 3) wires down to the basement, which is where a Midon Design bus controller (at the time, “TEMP05”, but he’s up to “TEMP08” now!), connected via RS-232 to an always-on PC, was located. On the PC, I ran Homeseer: a script would pull ASCII weather data generated by the TEMP05 and log it, and I had other scripts to graph weather trends. The weather station used a 1-Wire temperature sensor for measuring outside temperature, and other 1-Wire devices to transmit wind speed and direction. That setup worked for quite a few years, until our Pacific Northwest weather did it in. I’ve since graduated to a David Instruments weather station - more on that later.
Along the way, I also hooked up a couple of DS18S20 temperature sensors, mostly out of curiousity, and it was through these experiments that I learned a bit about best practices - for my house, anyway - for implementing a reliable 1-Wire bus. I wanted to use, where possible, the existing CAT-5 home-run wiring I had installed in the house… but given that I had a single bus controller - the TEMP05 - I knew that a star configuration would not work. So I had to daisy-chain together the network segments, including the long run to the weather station on the roof. I found that this configuration didn’t work reliably under parasitic power, but fortunately, the TEMP05 device makes it easy to provide the +5V Vdd needed to power the microlan.
This helped, but it still wasn’t rock-solid reliable. In most cases, it didn’t matter, given that I could poll for temperature readings every minute or so and average the results. Adding reflection-dampening resisters (per Midon Design advice) helped some. But I didn’t like the idea that I had to custom-tune the network every time I changed or added devices. A more robust and easy-to-get-right solution seemed to require multiple controllers, perhaps one per physical network leg?
Along that line of thinking, I tried out a relatively inexpensive ($29) bus controller, the “CK0110” four-channel kit from Carl’s Electronics, which seemed to be able to support 4 microlans. That helped.
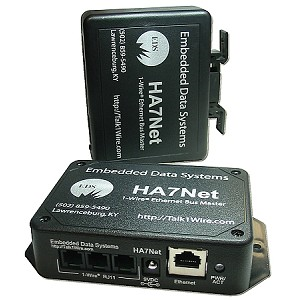
At some point, I stumbled upon Embedded Systems’ TCP/IP-based bus controller, the HA7Net, which does this: you connect up to three microlans to it, add power, and patch it into your LAN. It looks like this:
You can then point a browser at it and query the devices that it is managing on any of the three microlans. Furthermore, you can connect to it via a telnet session, which is how I integrated it into Homeseer (via the Ultra1Wire plugin, a newer version of which can be found here). I liked this approach because it meant one less RS-232 serial port to deal with (although this turns out to have been a temporary phenomena, given the approach I took to integrating with A/V receiver and monitor - see this post for the details).
The scenarios supported by these 1-Wire temperature sensors had expanded at this point to include:
- Turn on bathroom fans if someone is taking a shower, run for 10 minutes after shower ends (this one took a while to pull off, but now it seems perfectly commonplace)
- Turn on Kitchen fan if high temperature detected over the stovetop
- If temperature in computer rack gets too high, warn
(See this list for a complete list of implemented and planned scenarios)
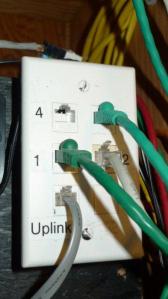
Those scenarios required 5 or 6 sensors, which means that, with the HA7Net’s support for only three microlans, I would have to daisy-chain a few of the sensors, all of which were hanging off the far ends of CAT-5 homeruns, in the various corners of the house. The approach I took was to wire up a daisy-chain junction box, located in the basement. Here’s a photo:
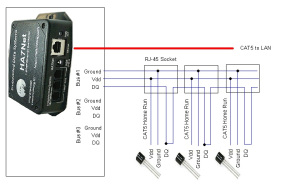
 At each device, one conductor brings the DQ signal line “in” to the device, and another conductor takes it “out” to the next device down the line. All devices are wired to the same power and ground conductors. The junction box down in the basement contains RJ-45 sockets into which patch cables, each one representing a device, are plugged in. One end of the chain goes to the HA7Net.
The “Uplink” cable connects to the HA7Net. The patch cables connected to sockets labeled “1”, “2”, and “3” connect to various 1-Wire temperature sensors, via the house patch panel.
Here’s a schematic:
This is the setup I’m using today. It’s reliable and easy to work with, and the availability of a well-built Homeseer plugin (the Ultra1Wire mentioned above) makes system integration very easy.
If I were starting over now, I would probably end up with a similar arrangement, despite the proliferation of cheap TCP/IP-enabled hacker boards. It’s hard to beat the <$5 price for a sensor-cum-network adapter. And the HA7Net bus master, while not cheap, is reasonably priced given that it’s TCP/IP-enabled and, since it supports three microlans, effectively means that you’d only need one in your house. (You could also substitute an Ardruino, using the 1-Wire library). If I were to try to build a network of temperature sensors that, for instance, is based on TCP/IP instead of 1-Wire, the per-device price would be much higher - for instance, the Arduino ethernet shield goes for $39-$45.
This would be a good point to make a general point about the world of devices or the so-called “Internet of Things” (see overview post)… while TCP/IP will be the dominant protocol at the high-level, since that’s how our top-level controlling computers are connected, down at the leaf nodes, where cost and size factors are important, alternate special-purpose protocols, such as 1-Wire, will be in abundance. Other examples include: the ZigBee wireless protocol, with low-power boards starting at $23, Bluetooth for $45, and the “Nordic” nRF24L01+ series, starting at $34… while some of these prices approach that of, say, the TCP/IP-based WiFi protocol, their physical size and complexity is much less so in comparison.
Even as the cost of TCP/IP-enabling devices drops in price, the lower-boundaries (size, cost) will also continue to drop. I think the thing to focus on is that 1-Wire devices are addressable, given their unique IDs, and ability to connect to a bus that can be bridged (via devices like the HA7Net) to the TCP/IP and therefore the Internet. Thus: not every connected device in the world will have a TCP/IP address, but you’ll still be able to talk to it, learn its state, and issue commands to it. That’s OK, I think.
NOTES
- Carl’s Electronics offers an inexpensive RS-232-based 4-port 1-Wire bus controller kit.
- Quozl (http://quozl.us.netrek.org) is an interesting fellow and offers an interesting site, describing a number of open source projects and hacks. He supplied the code for abovementioned 4-port 1-Wire bus master.
- Arduino support for 1-Wire: background and library: http://www.arduino.cc/playground/Learning/OneWire
- More background on 1-Wire, including links to software for directly driving the 1-Wire bus from a PC: http://www.arunet.co.uk/tkboyd/e1didx.htm.
- Hobby Boards (http://www.hobby-boards.com/catalog/index.php) offers a range of 1-Wire devices and kits, including: temperature, humidity, relays, displays.
- I used - for the first time - “TinyCAD“, an excellent free schematic drawing tool, to draw the 1-Wire schematic above. I found it very easy to use.
‘Bots in the Basement
It’s one thing to write about this stuff, but it’s another thing entirely to get hands-on with it. Since I’m after some credibility here, this post is about some of my own connected experiences, starting in the Home Automation space, in which I started dabbling around 2001.
I try to take a “scenarios-oriented” approach when messing with the house, given that its other occupants may not have a high degree of tolerance for things that don’t work as expected. It’s a goal that any new scenario adds value (in terms of safety, security, energy conservation, comfort, convenience, etc) in a seamless and reliable manner. Sure, sure, sounds good, right?
Here’s a list of scenarios implemented to date:
Lighting
- Turn off lights if rooms aren’t occupied, or after a certain amount of time
- If security system is armed, randomly cycle lights to simulate occupancy
Fans
- Turn off bathroom fans and Kitchen exhaust fan after 10 minutes
- Turn on bathroom fans if someone is taking a shower, run for 10 minutes after shower ends (this one took a while to pull off, but now it seems perfectly commonplace)
- Turn on Kitchen fan if high temperature detected over the stovetop
- Periodically, run fan in the cats’ litter box area
HVAC
- Set temperature back in all zones when no one is home (that is, when the security system is armed) and return to normal schedule when someone comes home (security system is disarmed)
- Periodically, set correct time on thermostats
- Periodically, run the hot water recirculation pump
Security
- Send email notice when security system is armed, disarmed, or when there’s an actually alarm
- Notify if garage door is left open, provide option for remotely opening/closing it.
- When someone comes home (and disarms the security system), turn on certain lights for convenience
- When security system is armed, randomly turn on/off certain lights at night to simulate occupancy
Irrigation
- Run sprinkers on regular schedule (depending recent rainfall, as detected by local weather station)
A/V
- In main zone (living room): If DVD is turned on/off, also turn on/off receiver and monitor, and set receiver source accordingly, for main and 2nd zones. Ditto XBox
- In main zone (living room): If volume up/down is used on any remote, adjust receiver volume
- In Kitchen zone: if kitchen radio is turned on/off, also turn on receiver zone #2 and set source. Monitor volume keypad for key presses, and adjust zone volume accordingly.
Reminders, Warnings, and Notices
- Send email note reminding to take out Trash and Compost bins. Scrape city’s web site to also determine if it’s a Recycling day
- Send nightly reminder note to close apps for better backups
- If the security system is armed at 10pm at night, send an summary note summarizing the status of the automation system
- If temperature in computer rack or over kitchen stove top gets too high, warn
- Send note if temperate has dropped to near-freezing
These scenarios are implemented via these components:
Homeseer Home Automation server (http://homeseer.com): software installed on a small headless box running 7×24 in the basement. Presently, this represents the main controller and (browser-based) user interface for all home automation scenarios.
6Bit TCP/IP-controlled relay and input board (http://www.6bit.com – appears defunct at this time): I can telnet into this board and command any of its 6 relays to open/close or sense when any of 12 inputs go low. Can also download simple macros, such as: “close relay 1 and open in 10 seconds”. This board is used to: sense when the garage door is open (I mounted a switch on the door opener, a bit of a story in itself), and to sense when certain devices turn on (such as the DVD player, Xbox, or kitchen radio) or when buttons are pushed (such as the volume up/down buttons on the kitchen keypad), or when the security system signals an “armed” / “unarmed”, “normal” or “alarm”, or “motion in zone x”. The relays on the board are used to: close the garage door and energize any of the three sprinkler valves. Homeseer and the 6Bit box communicate with each other via a virtual COM port. The 6bit box also offers an HTTP service, so you can use a browser to configure it, etc. It uses a Lantronix XPort device (http://www.lantronix.com/device-networking/embedded-device-servers/?tab=0) to connect the board/sensor logic to the LAN. It’s too bad that this company appears to be defunct/zombied, as the board is well-designed and constructed. My guess is that if I had to replace it, I’d go the Arduino route.
Ha7NET 1-Wire Ethernet Host Adapter (http://www.embeddeddatasystems.com/HA7Net-Ethernet-1-Wire-Host-Adapter_p_22.html): You plug this small box into your LAN. You also plug into it your “1-Wire” networks. “1-Wire” really is “3-Wires”, but that’s OK, it’s only Marketing. 1-Wire devices are small, cheap, nominally intelligent devices. I use the DS18S20 temperature sensor, which looks like a small transistor and costs < $5. You can plop any number of these devices onto the same run of 3 wires: Signal, Ground, Power. Each device has its own unique ID, and implements a basic protocol for manipulating the 1-Wire bus in order to communicate with the host adapter. I have three little networks of these devices in my house (due to topology requires of the 1-Wire bus), which all terminate at the host adapter. On the Homeseer controller application, there’s a plug-in (from Ultra1Wire) that knows how to find and communicate with the Ha7NET box to get regular (every couple of minutes) updates from the sensors. The Ha7NET box also offers an HTTP service that you can hit with a browser to configure the device, get an inventory of devices on the 1-Wire net, etc. Prior to the Ha7NET board, I used a Midon Design “Temp 08” board (http://midondesign.com/TEMP08/TEMP08.html), that connected to the Homeseer app via serial port. But I wanted to move away from serial-based boards…
Davis Scientific Weather Station (http://www.davisnet.com/weather/products/vantagepro.asp): with a TCP/IP-enabled console. The console communicates with the Davis Scientific “http://WeatherLink.com” web site on a regular basis, sending up weather stats like temperature, wind, etc. The site also sends that info over to any of several popular weather sites such as http://weatherunderground.com. I wrote Homeseer scripts that regularly pull down relevant stats – such as recent rainfall – to guide the sprinkler schedule. So, it’s a bit roundabout - weather bytes travel from the weather station on my roof, to the console in our kitchen, and there to the WeatherLink site, and then over to WeatherUnderground, and then back down to the Homeseer app running on a PC in my basement. Presumably they’re out of breath when they arrive. An interesting bit of system engineering, but it’s not always reliable (more on that later).
Z-Wave light switches and modules (http://www.z-wave.com/modules/ZwaveStart): Z-Wave is a specification / industry consortium for RF-based switches and controllers that enable remote control and sensing in the house. I have about 10 Z-Wave light switches installed throughout the house, and a Homeseer-branded Z-Wave controller connected to the Homeseer PC via serial port. As a result, Homeseer knows when someone has turned on a light in, say, the family room, and can be scripted to automatically turn if off after, say, 20 minutes. The Z-Wave light switches look mostly like regular Decora-style light switches, with some quirks and other characteristics. Z-Wave devices communicate via an RF mesh… each device spends some time getting to know its neighbors, forming primary and secondary paths to them based on signal strength. When a device wants to communicate to the controller (connected to the PC), it asks its neighbors to route the message along, via the mesh. The advantage in this approach is that the mesh can dynamically deal with sudden obstructions that might block a primary path, such as if a refrigerator door (a large metal object) is opened, or a car pulls into the garage, or permanent obstructions; in my house, one or two of the Z-Wave devices have a clear (RF) view to the controller, as there are all sorts of heating ducts in the way (ever see the movie “Brazil“??). So the mesh concept comes in handy, but it does have its downsides, in terms of complexity, reliability, and ability to debug, which I’ll relate in a later post. But it’s a heck of a lot better than “X10” (http://www.x10.com), an earlier approach (based on sending signals over the AC powerline) to control and sensing in the home. (Some of you may remember how, in the early days of the web and pop-up ads, it seemed that every other ad was for X10…)
Proliphix web-enabled thermostats (http://proliphix.com): Proliphix offers a line of high-quality thermostats that just happen to sport web interfaces and an API. So, you can hit the home page for one of these thermostats and see the current temperature in that room, the current heat/cool setpoints, the setback schedule, and so on. We have three zones in our little house (one for each of the basement, first floor, and second floor), and there’s a plug-in for Homeseer that surfaces key metrics and commands, so that it’s easy to, say, write a script that sets the heat setpoint back if no one’s in the house.
Security System: I’ve installed a mid-level security system, which, until recently, really didn’t want to play well with the other systems. I managed to arrange its typically archaic programming of zones and sensors so that it closes relays for certain conditions (system armed/disarmed, alarm, activity in certain zones), which are connected to the 6bit board’s input sensors, which Homeseer can track. The end-result is that Homeseer knows about certain security system events, and I can script scenarios such as this: if the security system is armed, set back the Proliphix thermostats to save on heating costs.
USB-UIRT IR receiver/transmitter PC interface (http://www.usbuirt.com): this is a small box that connects via USB to the PC running the Homeseer control application, and is apparently manufactured by a guy in a garage. Homeseer can sense (via a plug-in) when certain IR signals have been received (after training) or transmit IR signals (after training). The result is that I can write scripts like this: “if the volume up button is pressed on the Xbox remote control, then send a signal to the Denon receiver to increment the volume”.
Other elements
I have a Denon receiver with an RS-232 port on the back, which enables communication with a PC or controller. The receiver is connected via serial cable (straight-through! straight-through!!) to the PC running Homeseer. I’ve written scripts for Homeseer which can read responses from, and write commands to, the receiver. So, for instance, someone changes the volume on the receiver – either directly, by turning the knob, or via a remote – the receiver dutifully outputs some characters through the serial port, and my script running on Homeseer can track the changes (updating Homeseer variables which represent the volume level). Similarly, I can, via script, programmatically change the volume on the receiver. Or, I can script Homeseer so that if the DVD player is turned on, the receiver is turned on and its input source set to “DVD”. There’s a similar arrangement with the monitor in the living room. I’ll post more details on how the A/V system is scripted, as I think the resulting level of simplicity it affords to the end-user (no more confusion about remotes, and no more need for universal remotes) is worth sharing.
Some additional, quick notes
- I’ve tried to move away from serial-based connections (RS-232, USB, etc) and towards TCP/IP, since the resulting simplicity and flexibility (in topology, distance, etc) is worthwhile. The 6bit relay/sensor board, Ha7NET 1-Wire host adapter, and the Proliphix thermostats listed above all communicate via Ethernet. However, I found it much easier to program, and reliable, to stick with the antique RS-232 interface for integrating with the A/V components (receiver, monitor, IR controller). More on this later.
- I have this hang-up/obsession around the importance of instant and relevant feedback when dealing with the humans in the house (at least, when it comes to the home automation
. If someone presses a button and nothing appears to happen quickly – even if, under the covers, millions of compute cycles are cycled, thousands and thousands of disk seeks are commanded, and umpteen packets are zipped around LAN and WAN, all in service of that human’s simple action – that stinks. The human is left wondering… did I do something wrong? Or did this stupid system fail again? More on this later.
- Another hang-up/obsession: I don’t have (much) patience for systems that fail, especially those that fail silently. I’ll go out of my way – in the form of extra coding, hardware, wiring, etc – to ensure that systems are built to be reliable, and that if they do fail, they don’t fail silently. More on this later.
All together, I think this loose constellation of systems and components, held together with lots of Homeseer scripting, does add value in a mostly seamless or even invisible way. There’s lots of room for improvement (for instance, extended power failures can be tough to recover from…). And if viewed from the perspective of, “Is this ready for the mainstream??”, the answer is a clear “No!”. More on this later.


